ステップバイステップで見る MTAppjQuery v3 のコンディショナルフィールドの使い方
目次
あっという間に師走、時が経つのは本当に早いですね。ということで、この記事は 「Movable Type Advent Calendar 2023」6日目の記事です。
今年は待ちに待った Movable Type のメジャーバージョンアップがありましたね。Six Apartの皆様、お疲れ様でした。
それに合わせて、MTAppjQuery もメジャーバージョンアップしまして、v3 をリリースしました。
MTAppjQuery v3 では、いくつかの新機能がありまして、個人的にとても便利だろうなと思うのは「スライドエディタ」と「コンディショナルフィールド(マルチフィールドの中のフィールド)」、「フィールドの開閉」です。
スライドエディタ
横からシュッと出てくるUIも気に入ってますが、ユーザー目線で考えた時に、フィールドごとにボタンを変えられるというのは便利だと思います。
太字、リンク、リストだけのシンプルなリッチエディタでいいフィールドもあれば、フルでボタンがあった方がいいフィールドもありますからね。

フィールドの開閉
これはマルチフィールドの中の話ですが、マルチフィールドを使っているとどうしても画面が縦に長くなりがちです。それをササっと折りたたんでコンパクトにできるのはなかなか良いと思います。特にフィールドを上下に移動して順番を変える時には重宝しそうです。

コンディショナルフィールド
これもマルチフィールドの中の、さらに汎用フィールドの中の話になりますが、任意のフィールドの値によって、別のフィールドを表示・非表示を切り替えることができます。
今まで(MTAppjQuery v2)でもこのようなフィールドは独自のフィールドを作れば実現できましたが、これはマルチフィールド本体で実装すべきだとずっと思っていました。

今日の記事では、このコンディショナルフィールドの実装方法をサンプルを交えてご紹介します。
コンディショナルフィールドの実装方法 - ニュースサイトのコラム
今回は、ニュースサイトのコラムの著者情報欄をサンプルに実装してみたいと思います。
仕様
bit part news というニュースサイトがあり、以下の二つのコンテンツタイプがあります。
- コラム
- 著者
コラムの中に「著者」フィールドがあり、当ニュースサイト所属の著者の場合は「著者」コンテンツタイプから選択、それ以外の場合は名前等の情報を入力するという仕様です。
完成イメージ
完成イメージは下記のようになります。
大枠の作成
まずは下記のコードを user.js に貼り付けて「著者」という名前の汎用フィールドの大枠を作ります。
(function ($) {
    if (mtappVars?.contentType?.name !== 'コラム' || mtappVars.screen_id !== 'edit-content-type-data') return;

    const fieldBlocks = {
        author: {
            type: 'multipurpose',
            label: '著者',
            addClass: [''],
            innerGroups: [
                {
                    handle: 'authorType',
                    title: '著者タイプ',
                    hasBorder: true,
                    fixed: true,
                    addGroupClass: '',
                    fields: []
                }
            ],
            data: {}
        }
    };
    const fieldGroups = [['author']];
    mtapp.multiField({
        debug: false,
        version: 3,
        id: mtapp.getContentFieldIdByLabel('著者'),
        label: '著者情報',
        showViewRawDataButton: true,
        fieldBlocks: fieldBlocks,
        fieldGroups: fieldGroups
    });
})(jQuery);
上記コードの詳細は、MTAppjQuery をご購入後にサポートサイトを見ていただくとして、これで下図のように著者フィールドの枠ができました。
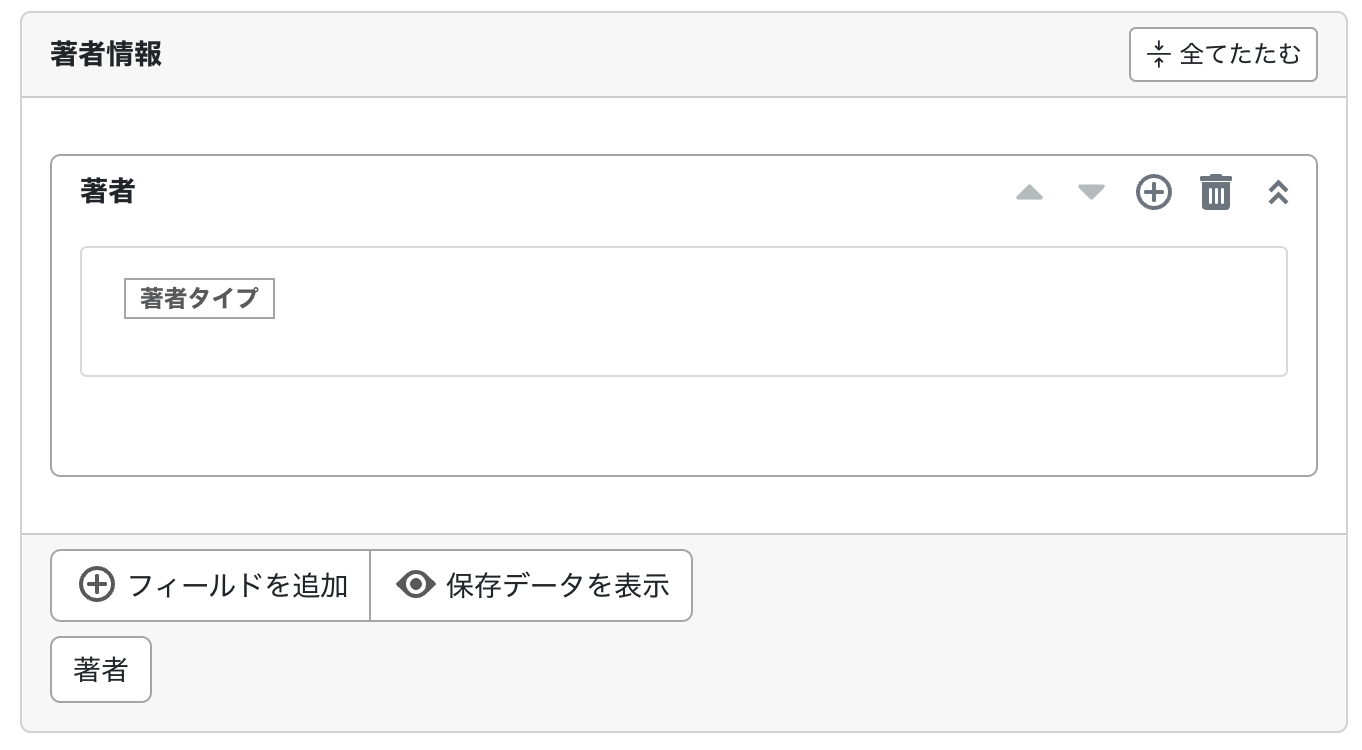
著者タイプフィールド
続いて、fieldBlocks に著者タイプを選択するラジオボタンフィールドを作ります。下記のように authorType というフィールドブロックと(追加1)、author フィールドの innerGroups の中に authorType というフィールドを表示するようにします(追加2)。
(function ($) {
    if (mtappVars?.contentType?.name !== 'コラム' || mtappVars.screen_id !== 'edit-content-type-data') return;

    const fieldBlocks = {
        // 追加1ここから
        authorType: {
            type: 'radio',
            label: '著者タイプ',
            data: '',
            options: [
                { label: '所属著者', data: 'bitpart' },
                { label: '外部著者', data: 'other' }
            ]
        },
        // 追加1ここまで
        author: {
            type: 'multipurpose',
            label: '著者',
            addClass: [''],
            innerGroups: [
                {
                    handle: 'authorType',
                    title: '著者タイプ',
                    hasBorder: true,
                    fixed: true,
                    addGroupClass: '',
                    fields: ['authorType'] // 追加2
                }
            ],
            data: {}
        }
    };
    const fieldGroups = [['author']];
    mtapp.multiField({
        debug: false,
        version: 3,
        id: mtapp.getContentFieldIdByLabel('著者'),
        label: '著者情報',
        showViewRawDataButton: true,
        fieldBlocks: fieldBlocks,
        fieldGroups: fieldGroups
    });
})(jQuery);
これで下図のようになりました。

所属著者フィールドと外部著者フィールド
続いて、当ニュースサイト所属の著者を選ぶコンテンツデータフィールドを入れるブロック(追加3A、B)と、それ以外の著者の情報を入れるブロックを追加します(追加4A、B)。
(function ($) {
    if (mtappVars?.contentType?.name !== 'コラム' || mtappVars.screen_id !== 'edit-content-type-data') return;

    const fieldBlocks = {
        authorType: {
            type: 'radio',
            label: '著者タイプ',
            data: '',
            options: [
                { label: '所属著者', data: 'bitpart' },
                { label: '外部著者', data: 'other' }
            ]
        },
        // 追加3Aここから
        bitpartAuthor: {
            type: 'contentData',
            label: '所属著者',
            siteId: mtappVars.blog_id,
            contentTypeId: mtappVars.contentTypes.find(
                (contentType) => contentType.site_id === mtappVars.blog_id && contentType.name === '著者'
            ).id,
            radio: false,
            modalEdit: true,
            modalCreate: true,
            includeDraft: false,
            status: null,
            params: null,
            dataLabelName: '名前',
            selectButtonLabel: '',
            createButtonLabel: '',
            paginate: {
                limit: 20
            },
            options: [],
            data: []
        },
        // 追加3Aここまで
        // 追加4Aここから
        otherAuthorName: {
            type: 'text',
            label: '著者名',
            data: ''
        },
        otherAuthorCompany: {
            type: 'text',
            label: '会社名',
            data: ''
        },
        otherAuthorProfile: {
            type: 'tinymce',
            label: 'プロフィール',
            preset: 'simple',
            data: ''
        },
        // 追加4Aここまで
        author: {
            type: 'multipurpose',
            label: '著者',
            addClass: [''],
            innerGroups: [
                {
                    handle: 'authorType',
                    title: '著者タイプ',
                    hasBorder: true,
                    fixed: true,
                    addGroupClass: '',
                    fields: ['authorType']
                },
                // 追加3Bここから
                {
                    handle: 'bitpartAuthor',
                    title: '所属著者',
                    hasBorder: true,
                    fixed: true,
                    addGroupClass: '',
                    fields: ['bitpartAuthor']
                },
                // 追加3Bここまで
                // 追加4Bここから
                {
                    handle: 'otherAuthor',
                    title: '外部著者',
                    hasBorder: true,
                    fixed: true,
                    addGroupClass: '',
                    fields: ['otherAuthorName', 'otherAuthorCompany', 'otherAuthorProfile']
                }
                // 追加4Bここまで
            ],
            data: {}
        }
    };
    const fieldGroups = [['author']];
    mtapp.multiField({
        debug: false,
        version: 3,
        id: mtapp.getContentFieldIdByLabel('著者'),
        label: '著者情報',
        showViewRawDataButton: true,
        fieldBlocks: fieldBlocks,
        fieldGroups: fieldGroups
    });
})(jQuery);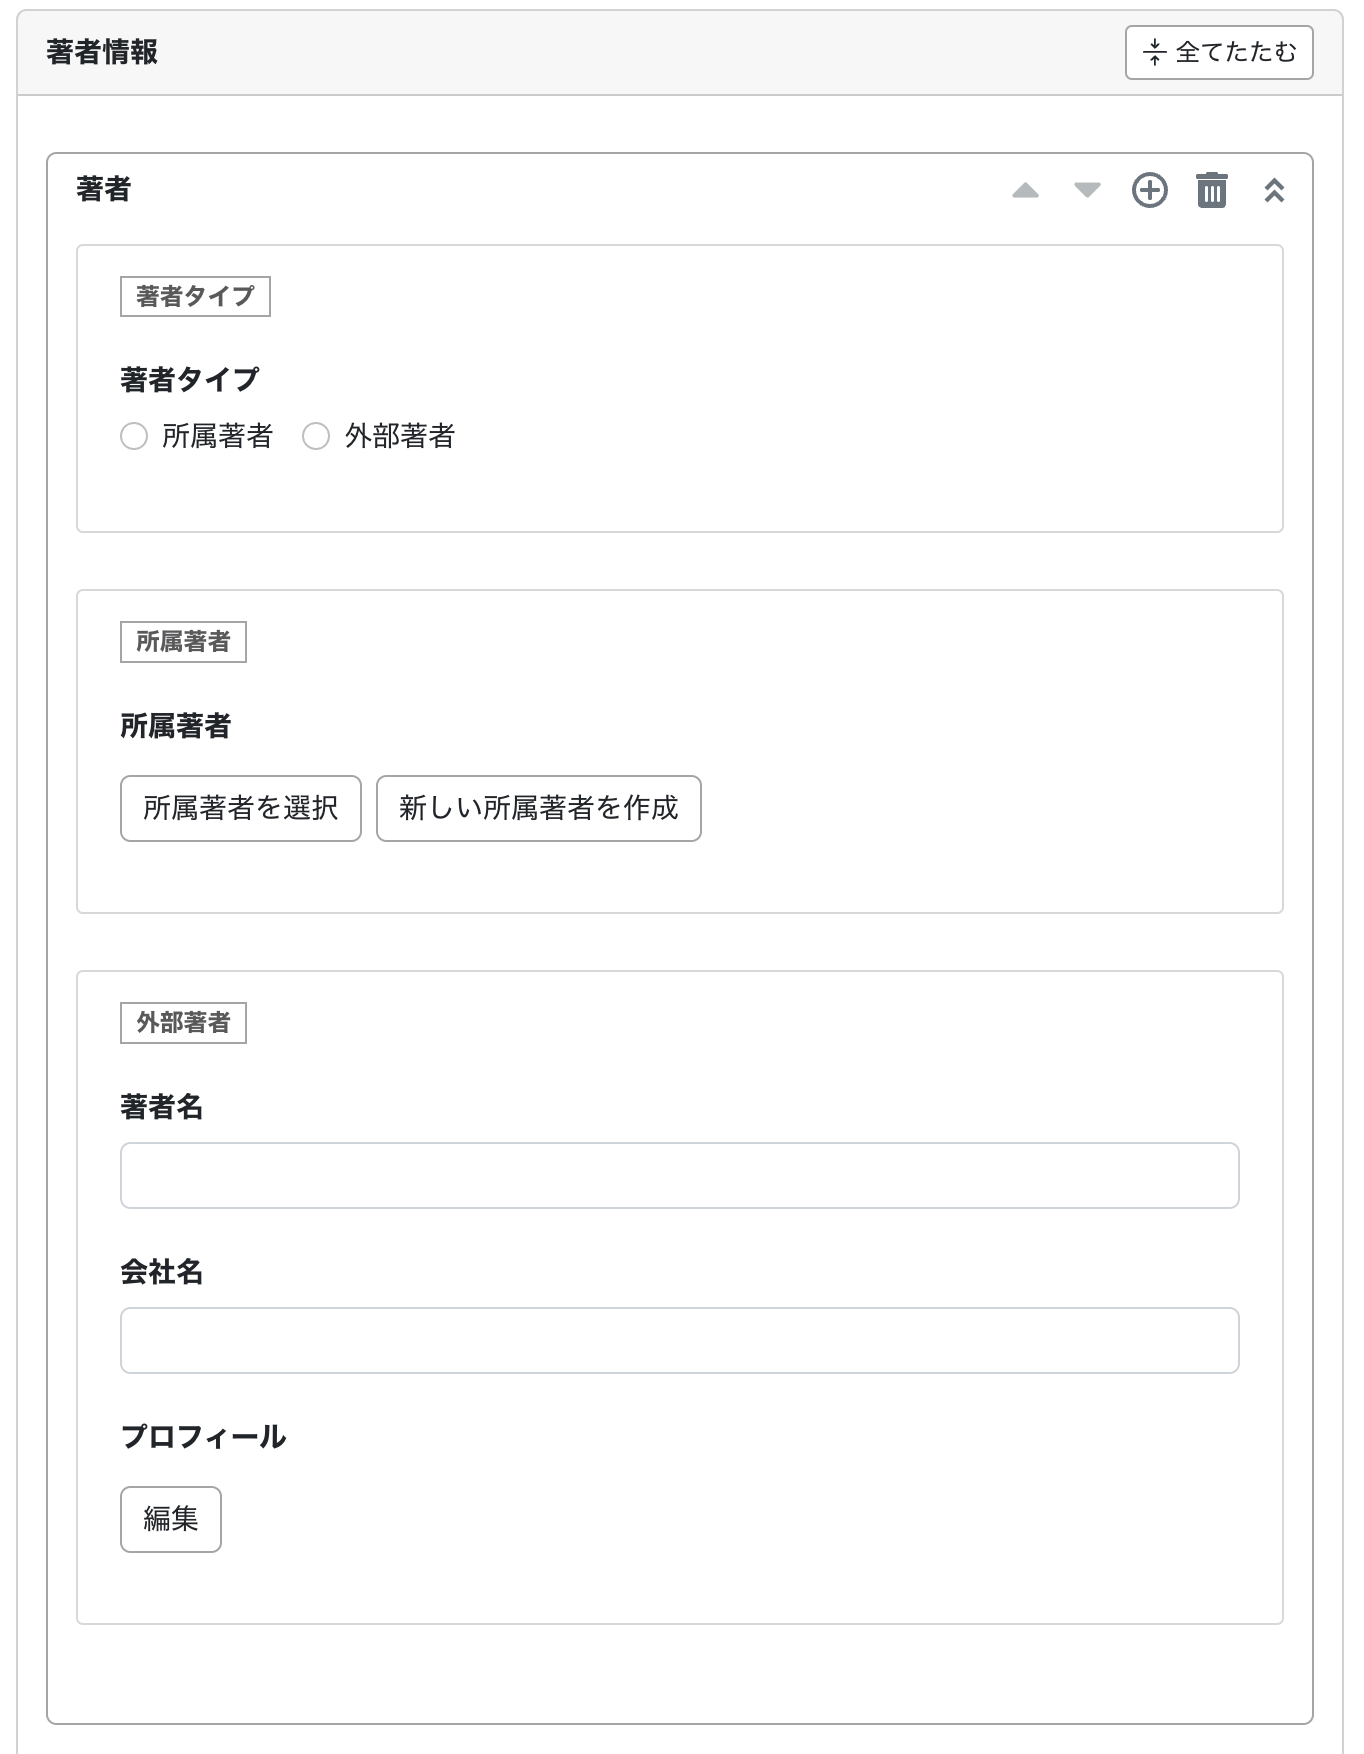
著者タイプによる条件分岐
ようやく本題といいますか、最後に著者タイプによる条件分岐を加えます。
条件を文書化すると以下のようになります。
- 著者が未選択のとき → 所属著者フィールドも外部著者フィールドも非表示
- 著者が「所属著者」のとき → 所属著者フィールドのみ表示
- 著者が「外部著者」のとき → 外部著者フィールドのみ表示
これを実装するには、innerGroups の中のオブジェクトに condition プロパティを追加して設定します。
condition には、下記のプロパティを持つオブジェクトを定義します。
groupHandle: 条件となるフィールドが属するグループのグループハンドルを指定します。fieldHandle: 条件となるフィールドのフィールドハンドルを指定します。fieldValue: 条件となるフィールドの値を指定します。
これを元に実装すると以下のようになります(追加5A、B)。
(function ($) {
    if (mtappVars?.contentType?.name !== 'コラム' || mtappVars.screen_id !== 'edit-content-type-data') return;

    const fieldBlocks = {
        authorType: {
            type: 'radio',
            label: '著者タイプ',
            data: '',
            options: [
                { label: '所属著者', data: 'bitpart' },
                { label: '外部著者', data: 'other' }
            ]
        },
        bitpartAuthor: {
            type: 'contentData',
            label: '所属著者',
            siteId: mtappVars.blog_id,
            contentTypeId: mtappVars.contentTypes.find(
                (contentType) => contentType.site_id === mtappVars.blog_id && contentType.name === '著者'
            ).id,
            radio: false,
            modalEdit: true,
            modalCreate: true,
            includeDraft: false,
            status: null,
            params: null,
            dataLabelName: '名前',
            selectButtonLabel: '',
            createButtonLabel: '',
            paginate: {
                limit: 20
            },
            options: [],
            data: []
        },
        otherAuthorName: {
            type: 'text',
            label: '著者名',
            data: ''
        },
        otherAuthorCompany: {
            type: 'text',
            label: '会社名',
            data: ''
        },
        otherAuthorProfile: {
            type: 'tinymce',
            label: 'プロフィール',
            preset: 'simple',
            data: ''
        },
        author: {
            type: 'multipurpose',
            label: '著者',
            addClass: [''],
            innerGroups: [
                {
                    handle: 'authorType',
                    title: '著者タイプ',
                    hasBorder: true,
                    fixed: true,
                    addGroupClass: '',
                    fields: ['authorType']
                },
                {
                    handle: 'bitpartAuthor',
                    title: '所属著者',
                    hasBorder: true,
                    fixed: true,
                    addGroupClass: '',
                    // 追加5Aここから
                    condition: [
                        {
                            groupHandle: 'authorType',
                            fieldHandle: 'authorType',
                            fieldValue: 'bitpart'
                        }
                    ],
                    // 追加5Aここまで
                    fields: ['bitpartAuthor']
                },
                {
                    handle: 'otherAuthor',
                    title: '外部著者',
                    hasBorder: true,
                    fixed: true,
                    addGroupClass: '',
                    // 追加5Bここから
                    condition: [
                        {
                            groupHandle: 'authorType',
                            fieldHandle: 'authorType',
                            fieldValue: 'other'
                        }
                    ],
                    // 追加5Bここまで
                    fields: ['otherAuthorName', 'otherAuthorCompany', 'otherAuthorProfile']
                }
            ],
            data: {}
        }
    };
    const fieldGroups = [['author']];
    mtapp.multiField({
        debug: false,
        version: 3,
        id: mtapp.getContentFieldIdByLabel('著者'),
        label: '著者情報',
        showViewRawDataButton: true,
        fieldBlocks: fieldBlocks,
        fieldGroups: fieldGroups
    });
})(jQuery);
これで下図のようなコンディショナルフィールドの完成です!

少し長くなってしまいましたが、JSONの設定だけで条件分岐フィールドができますので、ぜひお試しください。